Friday, May 28, 2010
Monkey Bread
My first taste of monkey bread was at a sleepover when I was a child. It was a recipe that my mom recreated for me a few times over the years. It's a breakfast that is ridiculously good. So good that even though I seem to go years between eating it, the memory of its goodness lingers on. As I was looking through the Pioneer Woman's recipes I saw a monkey bread recipe from her friend, Pastor Ryan. It's a standard recipe. I'm not trying it because it's different rather because monkey bread is simply delicious. Enjoy!
3 cans Buttermilk Biscuits (the Non-flaky Ones)
1 cup Sugar
2-3 teaspoons Cinnamon (I used 2 1/2 because I'm diplomatic.)
2 sticks Butter
1/2 cups Brown Sugar
Preheat the oven to 350 degrees.
Open up all three cans of biscuits and cut each biscuit into quarters.
Next, combine the white sugar with 2-3 teaspoons of cinnamon. Three teaspoons of cinnamon gives it a fairly strong cinnamon flavor. If you’re not so hot on cinnamon, cut it back to 2 teaspoons. Dump these into a 1 gallon zip bag and shake to mix evenly. (My mom and I used to dip each piece by hand with the cinnamon-sugar combination in a bowl. I decided to follow Pastor Ryan's instructions. It saved me a bowl, but I somehow ended up with a hole in the bag and a little mess. The mess and the fact that I'm OCD meant that I hand dipped some of them anyway.)
Drop all of the biscuit quarters into the cinnamon-sugar mix. Once all the biscuit quarters are in the bag seal it and give it a vigorous shake. This will get all those pieces unstuck from one another and nicely coated with cinnamon-sugar. Spread these nuggets out evenly in the bundt pan.
At this point, you’re going to want to melt the two sticks of butter together with ½ cup of brown sugar in a saucepan over medium-high heat. This can be light or dark brown sugar.
Cook butter/sugar mixture, stirring for a few minutes until the two become one. Once the brown sugar butter has become one color, you can pour it over the biscuits.
Bake for about 30-40 minutes until the crust is a deep dark brown on top. When its finished cooking, remove it from the oven. If you have the willpower, allow it to cook for about 15-30 minutes before turning it over onto a plate.
Chocolate Cupcakes with Sticky Chocolate Icing
Yesterday's recipe came from the Pioneer Woman. I decided to try her chocolate cupcakes. I made a slight variation to the recipe by omitting the Hershey kisses because I was choosing to use her sticky choclate icing. Since it seemed to be a richer icing I thought the Hershey kiss might be overkill. I'd like to try the ganache she has paired with the chocolate cupcakes, but the sticky icing required me to purchase less ingredients so it won for yesterday's test.
Cupcakes
2 cups Sugar
2 cups All-purpose Flour
1/4 teaspoons Salt
1/2 cups Buttermilk
2 whole Eggs
1 teaspoon Baking Soda
1 teaspoon Vanilla
2 sticks 1 Cup Butter
4 Tablespoons (heaping) Cocoa Powder
1 cup Water, Boiling
(If you don't have buttermilk on hand, you can measure a little less than 1/2 cup milk and top it off with white vinegar to make your own buttermilk. Since I have no regular use for buttermilk, this is what I generally do when I need it.)
Preheat oven to 350 degrees. Spray 18 muffin cups with baking spray. (My Baking Joy let me down yesterday which is why I generally prefer to use muffin liners)
To make the cake batter, combine flour, sugar, and salt. Set aside.
In a separate container, combine buttermilk, eggs, baking soda, and vanilla. Stir to combine and set aside.
In a saucepan, melt butter over medium heat. Add cocoa powder and stir to combine. Add boiling water, allow to bubble for a few seconds, then turn off heat.
Pour chocolate mixture over flour mixture. Stir a few times to cool the chocolate.
Pour buttermilk mixture over the top and stir to combine.
Pour 1/4 cup cake batter into each muffin cup.
Bake for 20 minutes. Allow to cool for 5 minutes in the pan, then remove cupcakes and allow to cool on a baking rack.
Sticky Chocolate Icing
3/4 cups Sweetened, Condensed Milk
6 ounces, weight Semi-sweet Chocolate
2 Tablespoons Butter
Mix ingredients together in a small/medium saucepan. Melt ingredients over medium low heat, stirring gently. Icing is ready when all ingredients are melted and combined.
Spoon warm icing over warm cupcakes, stirring icing to smooth after every third cupcake or so. Allow iced cupcakes to sit at least ten minutes before serving.
We had a jumper. Tragic, isn't it?
Want to know what's funny? I don't really like cake and I always seem to forget that when I get inspired to try a new cake recipe. The cupcakes and icing were good (my preference was the chocolate over the store-bought white), but they didn't blow my skirt up as the Pioneer Woman would say. Not because her recipe isn't good rather because I'm just not a cake person. So I can't fairly judge this recipe and I ended up sending all the cupcakes to school with Stalena for her fellow teachers. Oh well.
Monday, May 24, 2010
Baked Fudge
I have recently discovered The Pioneer Woman. Ree Drummond has a delightful website and cookbook full of great recipes, stories, and photographs. She's incredibly funny and I've spent a lot of time on her website. You should check her out (www.thepioneerwoman.com). I can wait here......see? Aren't you glad you looked at her site? It just makes you feel better. Today's recipe comes from her. Baked Fudge. Let's begin, shall we? I don't want to keep you from this recipe.
Baked Fudge (The Pioneer Woman)
1 stick butter (1/2 cup)
2 eggs
1 cup sugar
2 heaping Tablespoons cocoa powder
2 level Tablespoons flour
1 tsp vanilla
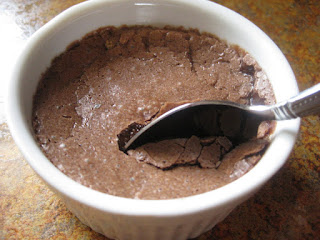
Preheat the oven to 300 degrees. If your oven doesn't get too hot, you can use 325. Melt 1 stick butter (1/2 cup) and set aside. Use an electric mixer to beat the 2 eggs until they are lighter in color. Since I don't have a stand mixer, I used my hand mixer. I know, it makes me sad too. Pour in 1 cup of sugar. Mix until thoroughly combined. Next, add 2 heaping tablespoons of cocoa powder followed by 2 level tablespoons of flour. Add 1 teaspoon of vanilla and your melted (but not too hot) butter. Mix on low-speed until well combined. Take a baking dish and fill about 1/2 way with water. Fill your ramekins evenly and place in the water. Bake for 40 minutes. When it's time to check them, use a toothpick. The top should be solid, but the toothpick should not come out clean. Ree warned that there's a trial and error process to this and she wasn't kidding. Make sure that the fudge doesn't jiggle when the ramekins are moved, but the inside shouldn't be a brownie consistency either. Mine (even after a few return visits to the oven) are still a bit thinner than I think they're supposed to be. However, they don't run off the spoon so I think we're fine for the first attempt. Ree made a heavy cream sauce for the top, but I don't have any on hand so I skipped that step. Now, let's look at the pictures so we can all enter a sugar coma together.
Please be very impressed by this action shot. I worked hard for it.
Friday, May 21, 2010
Apple Pie
I have baked my very first pie! I had the vision of making an apple pie with a lattice top and so I decided to try it. After talking with a few people, I realized that pie crust is supposed to be a somewhat difficult task. Yikes. I pulled out my trusty Betty Crocker cookbook and started to make a plan. I ended up using a pie crust from The Pioneer Woman's website. If you've never been to her website, you should check it out (www.thepioneerwoman.com).
Sylvia's Perfect Pie Crust from Pioneer Woman
1 1/2 cup Crisco (vegetable Shortening)
3 cups All-purpose Flour
1 whole Egg
5 Tablespoons Cold Water
1 Tablespoon White Vinegar
1 teaspoon Salt
In a large bowl, with a pastry cutter, gradually work the Crisco into the flour for about 3 or 4 minutes until it resembles a coarse meal. (I don't have a pastry cutter, so I used the two knife method.) In a small bowl, beat an egg with a fork and then pour it into the flour/shortening mixture. Add 5 tablespoons of cold water, 1 tablespoon of white vinegar and 1 teaspoon of salt. Stir together gently until all of the ingredients are incorporated.
Separate the dough into thirds. Form 3 evenly sized balls of dough and place each dough into a large Ziploc bag. Using a rolling pin, slightly flatten each ball of dough (about ½ inch thick) to make rolling easier later. Seal the bags and place them in the freezer until you need them. (If you will be using it immediately it’s still a good idea to put in the freezer for about 15 to 20 minutes to chill.)
When you are ready to use the dough to make a crust, remove from the freezer and allow to thaw for 15 minutes. On a floured surface roll the dough, starting at the center and working your way out. (Sprinkle some flour over top of the dough if it’s a bit too moist.) If the dough is sticking to the countertop use a metal spatula and carefully scrape it up and flip it over and continue rolling until it’s about 1/2 inch larger in diameter than your pie pan.
With a spatula, lift the dough carefully from the surface of the counter into the pie pan. Gently press the dough against the corner of the pan. Go around the pie pan pinching and tucking the dough to make a clean edge.
Because I wanted to do the lattice top, I followed the above steps and then rolled out a second crust. I cut it into strips and then placed them onto my pie. Ideally, I would have woven the lattice top, but then I actually realized how delicate pie crust could be so a simplified lattice top seemed perfectly acceptable.
Apple Filling from Betty Crocker
2/3 cup sugar
1/4 cup all-purpose flour
1/2 teaspoon ground cinnamon
1/2 teaspoon ground nutmeg
Dash of salt
8 cups thinly sliced Granny Smith apples
2 tablespoons butter
Heat oven to 425 degrees. Make pastry. Mix sugar, flour, cinnamon, nutmeg and salt in a large bowl. Stir in apples. Turn into pastry-lined pie plate. Cut butter into small pieces; sprinkle over apples. (Moment of honesty: I didn't fully read my recipe and so I mixed the butter in. Make sure you cut it up well so it can be distributed among the apples.) Cover with lattice top. Bake 40 to 50 minutes or until crust is golden brown.
Cover the edge of your pie crust with foil to keep it from getting too dark. Remove the foil for the last 10-15 minutes. Cool on wire rack at least 2 hours.
Result: A success! The crust was delicious and flaky, the apples a bit tart with some bite to them, and paired with vanilla ice cream it was perfect.
Sunday, May 9, 2010
Banana Chocolate Chip Cake #2
Chris passed this recipe along to me and it can be found on food2.com. It's actually Banana, Peanut Butter, and Chocolate Mini Cupcakes. However, I wanted it to be a bread shape and I'm not crazy about peanut butter, so I altered it a smidge. Plus, I'm trying to replicate Starbucks' and theirs is topped with mini chocolate chips. I liked this recipe much better than the first. The banana flavor was stronger which I find delightful and important when the word banana is in the title of a recipe.
Here's my version:
1 1/4 cups flour
1 1/2 tsp baking powder
1/2 tsp baking soda
1/4 teaspoon salt
3/4 cup sugar
1/2 cup (1 stick) unsalted butter, room temperature
1 large egg, room temperature
1 large egg yolk, room temperature
2 very ripe large bananas
1/2 cup yogurt
1 1/2 teaspoons vanilla extract
1/2 bag of mini chocolate chips
Preheat oven to 350 degrees. Grease a loaf pan. Whisk the first 4 ingredients in a bowl. With an electric mixer whip sugar and butter until fluffy, about 3 minutes. Add eggs and yolk, and mix until well combine. Smash up the banana with banana peel still on, and add to batter along with vanilla and yogurt. Mix for 1 minute. Add the dry ingredients in 2 additions mixing until just combine. Just before the last addition of flour is absorbed in the batter add mini chocolate chips. Fold 3-5 times until just combine. Spoon batter into loaf pan. Bake for.... I'm not really sure. It's been over a week since I made it. I think it was around 30 minutes. Your safest bet is to start lower in time and add on as needed. If you decide to make it as cupcakes, 15-20 minutes.
Subscribe to:
Posts (Atom)